
Every now and then you come across a model that's simply a delight to work with. She's nice, funny, got a great personality and totally down to Earth.
Oh and did I mention she's beautiful and has Victoria's Secret abs?
It's easy to overlook the physical attributes when you're stunning in all the right ways. Sorry guys, she's taken and her boyfriend's a nice guy too so you're all out of luck.
So I thought I'd change it up and really tell a story which I don't do enough here. I suppose what I left out of my "6 months review" was that I want to push myself explore the "uncomfortable". This for me means stepping outside the studio and shooting natural light, reflectors, on-location. In fact I had a night shoot today that got cancelled, but hopefully you get the idea and see where I'm going with this. I need to grow. I need to keep pushing photographically and in retouching. I've spent a significant amount of time in the retouching department and it's time to start wandering back into the photography department. In my last shoot(s) you can see this trend. I've been shooting in the backyard, the pool, the walls, the shake sidings along the house, hell it's been a shoot and half since I pulled the fashion-grey background that I've loved so much. But it's time for a change, really when is it ever not?
I haven't really stated this in writing here but I've been shooting more high-fashion and editorial content. I've always been so "face-focused" and captivated by faces that naturally my first images were beauty/glamour oriented. But as I grow in this field, I find that I've acquired a taste for the full-length frame and as such take more and more body into consideration.
With a body like Kendall's, the fine line between an acquired taste and a total obsession can quickly become rather blurry.
Michelle and Kendall styled this shoot. Michelle has been in an edgy/rock phase which totally suits my taste because I'm always bored of my own stuff. If you don't know me by now, I'm the one who runs a half-Ironman and upon finishing thinks that just because I've done it, it's really no big deal. So, you can say I've got the attention span of a goldfish or that I'm simply not easily impressed. Either way, this shoot was just what the doctor ordered.
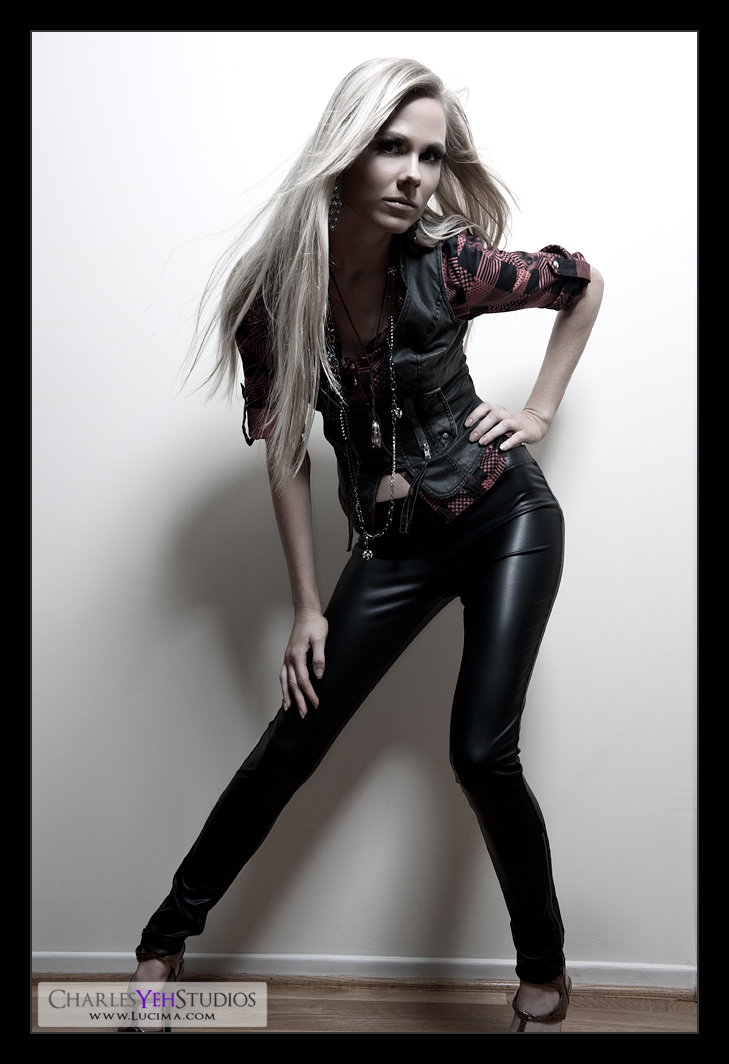
This first set aptly titled Kendall: In leather was done in 27 minutes which included all test shots, chatting, getting warmed up, turning on and off the fan, adjustments, etc. I mention this only because Kendall's performance allowed us to transition through 9 sets. That's 9 sets with different lighting and conditions. I've never shot more than 5-6 sets in a day so this was a first. But when you click with the model and everything just falls into place, you can get a lot done in a short amount of time.
Retouch-wise, I'll first settle the overall feeling and goal. First of all, I don't always know how I'm going to approach an image until I start to work with it. It's not always immediately apparent. The first thing I seem to always do is play with the levels and see what kind of contrast comes out of it. From there, I then fix major bugs/flaws/problems including liquify. Then I work on the skin tones/blemishes/smoothing. When I finish that, I look at the overall frame and then ask myself, "What does this picture need?". I'll play with the gradients, the B&W conversions, curves, it really depends on the look and feel.
For example, with this image the primary concern was the darkness under the eyes. I could have gone really dark like Kenna Features where I purposely burned the shadows under the brows. I decided against it and simply added some contrast via levels and curves and then desaturated with B&W. It was a little tricky because in the B&W conversion process I wanted to keep the reds in the shirt bright but pull the reds in the skin on the face so I did 2 B&W conversion layers (for desat) and masked one for face and one for everything else so I could tune the face differently from the rest of the body/wardrobe.
Because I used a B&W conversion layer, I didn't need a traditional B&W gradient map for more B&W effects. Instead I used a B&W gradient map set to luminosity blend for contrast.
In the sharpening phase, I didn't blur before converting to the new image size (1000 pixels). Instead, I downsized and applied a light sharpen via the spatial frequency separation method. I turned down the sharpening (low frequency layer) to 34% so while I could have gotten more sharpening out of this image, I didn't need it. In the end I tried adding a little noise back to the skin, but it didn't really need it so that was a wrap.
There's nothing special lighting-wise about this picture but the ones to come will have description and explanation behind the logic behind the process.
There was a small spot that irked me, and that's the skin between the vest that was visible. In its original form it looked like Kendall has a stomach, which is far far from the truth. The pose and the tightness of the pants made the stomach protrude slightly and it was fixed in post-processing.
Camera: D3/24-70mm f/2.8G @38mm, 1/200th, f/9.0, ISO200
Strobist: Tried and true AB800 in 22" beauty dish from upper camera right (no grid). SB-800 on-camera with RayFlash ringflash adapter. See here.
Model: Kendall B
Makeup: Kelli Zehnder
Wardrobe: Michelle Green
Camera: D3/24-70mm f/2.8G @38mm, 1/200th, f/9.0, ISO200
Strobist: Tried and true AB800 in 22" beauty dish from upper camera right (no grid). SB-800 on-camera with RayFlash ringflash adapter. See here.
Model: Kendall B
Makeup: Kelli Zehnder
Wardrobe: Michelle Green
Charles, I'm lost on your post processing, possibly because I'm only using open source tools (I like a challenge). How did you go about learning things like "B&W conversion layer" ?
ReplyDeleteAnyway, I really like your composition, the framing draws me into the shot, like I'm experiencing the photo, not just viewing it. Do you have formal art studies in your background?
Hey Dante, I posted a whole post answering your questions :) See "Answering Some Questions" above this post.
ReplyDelete