Tuesday, June 30, 2009

Time Machine


Whoa. I just got a glimpse of what Time Machine for Mac does. I thought it was just a backup/restore thing. It goes beyond that. You get complete control over the state of your computer in the past. You can pull old files or find stuff that might have been altered or deleted just by flipping through the various backups that have taken place over time.

Very very cool.

From
Apple

Time Machine. A giant leap backwards.
More than a mere backup, Time Machine makes an up-to-date copy of everything on your Mac — digital photos, music, movies, TV shows, and documents — so you can go back in time to recover anything.

You can start using Time Machine in seconds. The first time you attach an external drive to your Mac, Time Machine asks if you'd like to use that drive as your backup. Say yes and Time Machine takes care of everything else. Automatically. In the background. You'll never have to worry about backing up again.

Back up everything. Time Machine keeps an up-to-date copy of everything on your Mac. That includes system files, applications, accounts, preferences, music, photos, movies, and documents. But what makes Time Machine different from other backup applications is that it not only keeps a spare copy of every file, it remembers how your system looked on any given day — so you can revisit your Mac as it appeared in the past.

Enter the Time Machine browser in search of your long-lost files and you see exactly how your computer looked on the dates you're browsing. Select a specific date, let Time Machine find your most recent changes, or do a Spotlight search to find exactly what you're looking for. Once you do, click Restore and Time Machine brings it back to the present. Time Machine restores individual files, complete folders, or your entire computer — putting everything back the way it was and where it should be.

You're Making Me Nervous...

About a week ago, I corrupted Lightroom's catalog. I was in the middle of importing over 1,000 pictures and then I shut down the computer. In my defense, I could not tell if the import was running anymore because the Macbook (2.4 GHz) would not respond. How was I supposed to know it was still running. Using my handy Windows experience, I reset the computer by pushing the power button. Upon restarting, I realized that the import hadn't finished because Lightroom wouldn't start up. Unfortunately, my last backup of the catalog was over a week old. Fortunately, I hadn't done much importing and work on the catalog since (or so I thought), so I restored an older catalog, reimported some batches of pictures and went on my merry way.

By the way, this Macbook has the only copy of all my photoshoots for the past 2 months.

Does that make me nervous? Hell yeah that makes me nervous! It travels with me, which means every time I put it onto the conveyor belt for the x-ray machine, I've got to be extra careful with it. Anytime I set it down, I'm always doing so gently. Having it kept in the trunk of the rental car also makes me nervous especially when it's sitting next to my D3, 24-70mm f/2.8G, etc.

Smart? No. Time to backup my files? Yes.

After a little research I decided to get something small yet rugged in the event I want to pack this bad boy with me on the road. Ultimately I purchased a Transcend Storejet 25 500GB.


CNET said "The Transcend StoreJet 25 Mobile stomps the competition and lives to fight another day, thanks to its rugged military-grade exterior." I think I saw these in Taiwan when I was shopping around for portable hard disks. I should have just bought one but I wasn't ready and I didn't see anything with the form factor that I was looking for. In hindsight, the Transcend StoreJet 25 is not the smallest enclosed hard drives that I have ever laid eyes on. In fact, this originally didn't make the cut because of the size. However due to the fast transfer rates, the warranty, and the rugged exterior (drop tested), I decided to use this for my Time Machine (regularly scheduled Mac backups).

I know of a lot of photographers that have secondary and tertiary and even quaternary backup solutions for their not only their computers but also their CompactFlash drives. I don't. Yet. Just for my computer, which is for me already one big step forward. I suppose I could say that I have backups of all my CompactFlash drives because the D3 writes RAW onto disk1 and JPEGs onto disk2. So I always have a RAW disk and a JPEG disk. I always delete/format the CF cards after a week or so though to make space for the next shoot.

I'm backing up now onto the Transcend StoreJet 25 Mobile. Looks like its going to take a good hour or two to complete the task of backing up all 112GB from my hard disk. Oh and the good thing about these little puppies is that they don't require their own power (AC adapter), they get it straight from the USB 2.0 jack.

Thursday, June 25, 2009

Stimulating the Creative Glands: Amber in the Water


You'd think that I'd never get bored of shooting models but the truth is sometimes I tire of my own routine. I'm the kind of person who believes that nothing I do is extraordinary. I've raced triathlons, learned to surf, written music, etc. but if I can do it anyone can do it. It takes usually something new to impress me because my expectations are always set so high.

One sure-fire way to keep the innovation curve steep is to try something new in every shoot. Ender Nygen suggests this and I do too. It gives you an opportunity to be surprised at the end of every shoot. I've always defined excitement as the anticipation of the unexpected. Without excitement, I lose momentum for doing stuff, even the stuff that I like.

In this particular example, Amber requested we could do a shoot like the water shoot from ANTM (America's Next Top Model) Season 11. Not having shot someone in water, I was excited to see what kind of challenges such a set would provide.

Prior to the shoot I wondered whether her face would reflect well from the surface of the water. Having shot our pool in the backyard (and knowing a little about lighting), I understand that the angle of incidence equals the angle of reflection. Therefore, I need to get pretty close to the surface of the water in order to get a good reflection from the surface.

I also wondered whether or not I would be able to control the light well enough to prevent light from spilling into the background and lighting the red bricks that line the edge of the pool. Will people be able to tell that this was shot in a swimming pool? I knew I better keep the light nice and tight and so I chose to use a 20 degree grid on the beauty dish (AB800).

As these questions bounced around in my mind before the shoot. Amber walked into the pool like it was a spa. To me it felt like low 71 degrees Fahrenheit, but I don't enter any body of water without a wetsuit unless it's 78+ so I knew it was cold. Shivering and all she pulled looks like that made the water steam. I did my part by setting the lights prior to her entering the pool and trying to minimize the amount of time she stayed in there. All in all she was probably in the pool for about 10 minutes. What made it colder was the fact that we were shooting just after (8PM) to minimize ambient light. The worst part (for her) was that she had to limit her movement to minimize the ripples in the water since we wanted a glossy surface from the water. I mean, if she was allowed to do laps in the pool, it would have felt quite a bit warmer.

We shot probably about 30 frames or so. During the 10 minutes that she was in the water I was battling challenges like keeping the flare down from the gelled backlight (which I did not foresee). Another challenge was that Amber was originally wearing a white shirt which showed through the surface of the water. After removing the shirt, the frames came out much better. Lastly, I've done shoots with time restrictions but this was one of the first that I've ever shot in water and without previously testing how things would look. Fortunately with only 2 lights and a willing model, we nailed the shot in 10 minutes.

Post-processing took a little more time than normal because our background was not pitch black so a little clone-stamping was in order. Color-replacement was necessary to remove the blue hue of the water. Otherwise, it was a pretty standard Charles Yeh post-processed frame.

To conclude, I want to reiterate how much innovation stimulates the creative glands into creating more creative juices. Shoots like these that incorporate stuff that I've never done (or seen) are what keep me excited and constantly shooting.

Strobist info: Red gelled SB-800 from camera front right. Main light is an AB800 with gridded beauty dish from camera (slight) upper left.

Camera info: D3, 1/200th, f/5.0, ISO200, 130mm (Nikkor 70-200mm f/2.8G). Triggered with Gadget Infinity (Cactus) V4.

Tuesday, June 23, 2009

R&E (Research and Experimentation)

I used to spend a lot of time researching and experimenting. Whether it was lighting or retouching, I would play around with it until I achieved something. Sometimes I would fail at recreating a particular look and sometimes I would succeed. Sometimes I would get sidetracked by something different that would catch my attention and pull me astray thus leading me to other discoveries that I had not thought of before.

Truthfully, I don't consider myself to be a very creative person. I work well within structure once I am given the rules of how things are "supposed to work" in this world. If the scope is too vast, I don't do well. This is why I excel at understanding lighting and the technical aspects behind photography, yet I'm not exactly on the "cutting edge" of art and new ventures.

With that said however I understand that I'm still getting the hang of things and that you have to know the rules before you can break them. It's sometimes so hard to be patient with myself because I'm so eager to push the envelope but sometimes at the cost of truly learning/understanding the fundamentals. I still remember when it would take me over an hour to set the lights for any particular shoot because I'd have to run back and forth to the camera (when shooting myself) to ensure that my exposures per light were correct. I'm glad I allowed myself that time to learn and grow because these days I don't have more than 10 minutes to get things down stat. Fortunately I can approximate the right exposure per light and then tweak from there.

Researching and constantly learning new skills however big or small has been a large part of my growth in photography. As I've mentioned in previous posts, David Hobby has been a huge influence in kick-starting my work with lights. Learning lighting opened my eyes to a world that I did not know existed before. It's kind of like when someone mentions a place that you'd heard of before but never knew exactly where it was located,

Friend: "Have you been to the Galapagos?"

Me: "Heard of it, never been there"

Friend: "You should definitely check it out, it's really beautiful out there!"

Me: "Send me the pictures from your trip when you get the chance..."

Upon seeing the pictures, I'm then blown away by the richness in the colors as well as the natural beauty of the landscapes, not to mention the wildlife that is abound at the Galapagos... of course I've never actually been to the Galapagos much less seen pictures of the islands but from what I remember Charles Darwin found many animal and plant species over there.

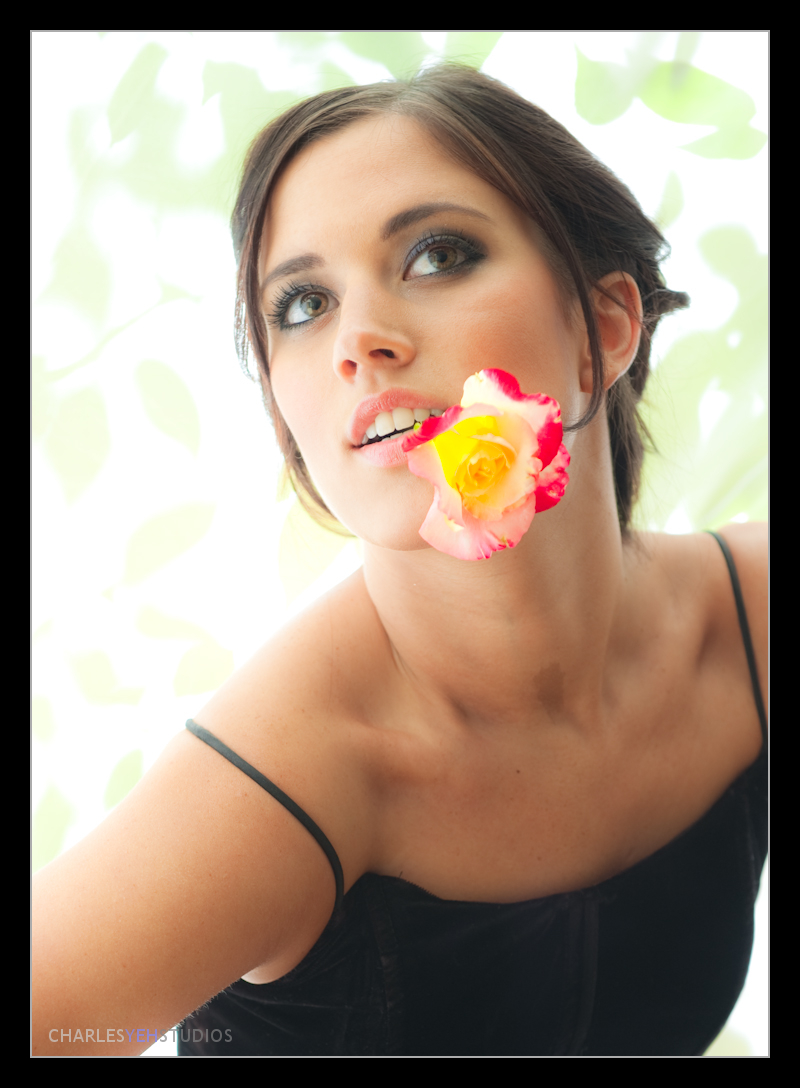
It's the same thing with experimentation. Just last week during Amber's shoot, her makeup artist Krystal suggested that we cut a few small branches from the tree outside and hold them against the bed sheet for the Anne Hathaway look. Initially, I had no idea what she was talking about. What would I do with tree branches behind the bed sheet? Curiosity won over my tendency to "stay the course" and minutes later I was clipping the tree in my front yard. Minutes later I was staring at the back of my camera looking at this:


I was blown away! The effect was awesome! Alone I would have never in a million years thought to try putting things behind the light source to create silhouettes much less tree branches. But my how it worked! The translucency of the bed sheet allowed some of the green to pass through the cloth and appear in the frames that we shot with Amber holding a rose in her mouth.

If necessity is the mother of all inventions, experimentation is undoubtedly the father of all inventions.

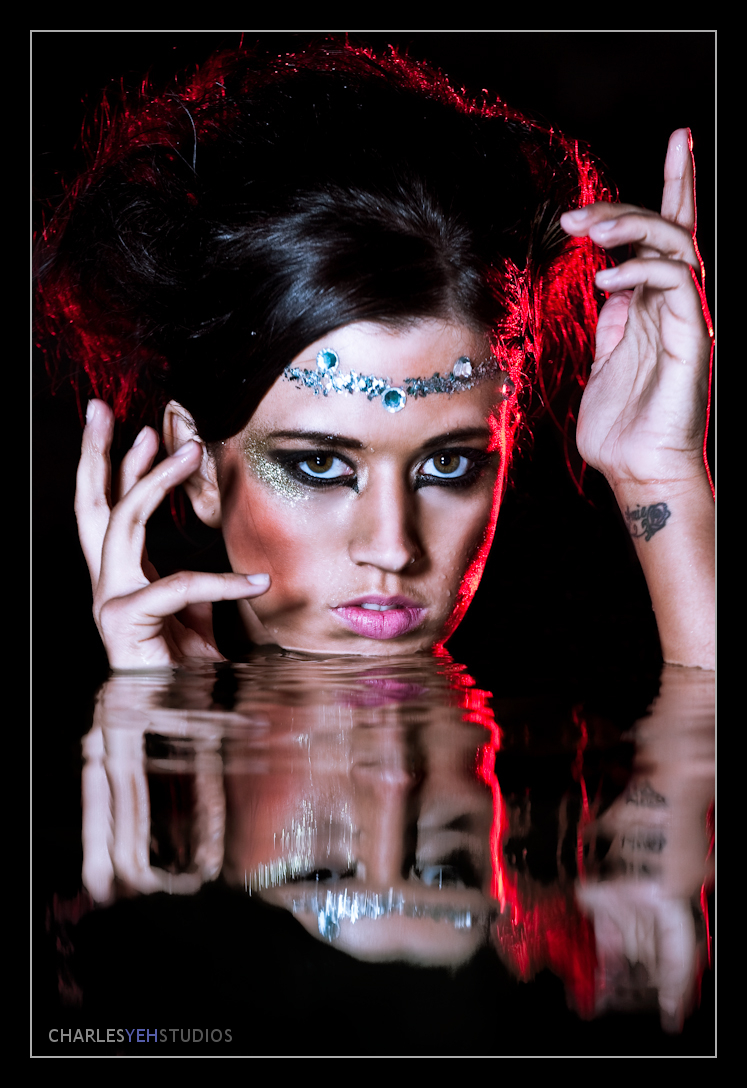
Another example occurred by pure accident when for whatever reason my main lights were off and the model (Stacy) was purely lit by kickers and a single hairlight. Seeing this on the back of my camera floored me! I felt sucker-punched by how much contrast there was in this lighting setup, so much so that we continued to shoot with this lighting over several more frames. Now a seasoned photographer might find this unamusing but I was thrilled when I saw this for the first time!


I could go on and on about other little discoveries that were made as a result of either research or experimentation. The point is that in order to grow and learn you must do both. Combined with asking the right questions and a little time to digest all you've discovered, you will grow in leaps and bounds.

Monday, June 22, 2009

Sunday, June 21, 2009

Asking the Right Questions


One of the most important things that I learned from my MBA program (actually my Psychology program) was that the right answers are not as important as the right questions. It's cliche these days but having the right answer does not help a photographer nearly as much as having the right questions.

For example, knowing that I should use a softbox instead of a beauty dish when taking pictures of older people isn't going to help me figure out what kind of light modifier to use on a model that has no makeup on. Neither will this information help me choose the correct light modifier for the style or feel or theme for any particular shoot. Asking, "Why are softboxes the preferred light modifier in almost every studio?" will allow you to understand the thought processes and the theory and the physics behind all that is relevant in the decision-making process for choosing light modifiers during a shoot.

I alluded to this concept towards the end of the last post of Amber McNeil: Anne Hathaway Lighting. I spent hours trying to figure out why the highlights in my recreations would not appear under the chin. Shining a light source under the chin wasn't the answer because it would create highlights elsewhere. However ultimately trial and error, I created a very similar look
one that ultimately led me to believe that the picture was created with a single large light source, hence the bedsheet.

The truth is I have unanswered questions in my mind all the time. I'm still relatively new at this and can benefit from more research as well as experimentation. Being curious and asking, "why does this work, but not this?" usually gets me moving in the right direction. Experimentation is your friend and once you have the right questions, the right answer isn't the answer itself but the process by which you attain your answer.

Another example of asking the right questions is the following picture:


This picture haunted me for a long time. For a long time I couldn't figure out why the picture sucked. This was primarily because I kept asking myself, "Why does this picture suck?" It wasn't until I started asking, "Why doesn't this picture have the 'punch' that I'm looking for?" that I asked myself, "Well, how do you define 'punch'?" Answering my own question I said, "Contrast between light and shadows (difference in exposure)" Suddenly I realized that the problem was that the subject was too evenly lit. Even though I used 3 light sources, the way that I used these lights was too similar. Without remembering the settings, it's obvious the background and the foreground don't have any contrast thus the lights were probably set to the same exposure on the subject. Furthermore the black background is painfully obviously black paper! Lastly, the subject doesn't have any shadows across the face therefore lacking the 3-dimensionality that I strive so hard to achieve in my work today. All these things were results of asking myself what I was trying to achieve in the picture and why the picture failed to achieve the effect. Asking why it didn't get me anywhere.

Never stop asking why. But in asking why always give yourself time to research and experiment. I'll leave this here and pick up with research and experimenting next time.

Amber McNeil: Anne Hathaway Lighting


Rarely do I do something completely in Lightroom (Lr2). However since the program is so robust I occasionally get the itch to bypass Photoshop completely and just retouch in Lr.

And it's all really simple stuff because Lr is so straightforward. Some clarity here, grayscale, individual color adjustments, color temperature with a slight tint added to bring out the colors, contrast/brightness, exposure adjustment, it's all there.

The focus for this picture was the softness and the rose in her mouth. So I brought out the colors of the rose as much as possible without destroying the grayscale skin tones. The hair and dress were of little to no concern to me.

Strobist info: I call this my "Anne Hathaway lighting" because the first time I saw this kind of light was from a picture of Anne Hathaway (see below). Since then I've enjoyed doing several different shoots with this lighting because it always delivers pleasant results. It's essentially one gigantic softbox. If you can't tell, it's a bedsheet strung up (clipped) on my background stands. Then a single AB800 blasts the sheet (white) with light. I think I only used 1/2 to 3/4 power on the AB800 which was about 6-7 feet away from the sheet. Things to note are to keep the model well within the sheet in order to get the major "wrap-around" effect of the huge light source.

Camera info: D3, 1/200th, f/4.5, ISO200, 70mm (Nikkor 24-70mm f/2.8G). Triggered with Gadget Infinity V4.

What I failed to mention in my flickr post regarding this picture is that this infatuation with the "Anne Hathaway lighting" was a result of multiple (failed) attempts at recreating the picture. The first time I saw this picture I was awestruck by the beauty and simplicity and most importantly the lighting. This was during my foray into strobist lighting when I was learning the ropes and reading up on the 101 and 102 lessons from David Hobby.


I first saw this picture as a composite of multiple highlights and did not piece together the fact that it was essentially one light source. I saw the burned highlights on the forehead, nose, cheeks, neck (particularly under the chin!), shoulders/back, and front of the forearms. With multiple lights I attempted to recreate this look but missing the mark with some missing highlights. Over time I tried and retried the look and would get closer with each try. In the back of my mind I always suspected that this picture was in fact one single large light source but it never occurred to me to test this theory because at the time I didn't think to use a bedsheet and shoot light through it. I only thought about the fact that my largest light source was an Apollo Westcott 50" softbox (which is actually pretty big). So it wasn't until much later that I finally got around to making more attempts.

Here's my first attempt at recreating this shot:


Ultimately I think the take-away point of all of this is not the fact that I finally figured it out but that I dared to ask the right questions. I will leave this here and pick up tomorrow with this as the subject.

Saturday, June 20, 2009

Why I'm here...

I'm here primarily because of my hero David Hobby. It simply seems that most of the photographers have blogger accounts rather than tumblr accounts. Actually it was seeing Ender Nygen's work here on blogger that ultimately really pushed me over the edge to create a blogger account. In addition, my tumblr account has gotten quite imbalanced with the number of photography posts I've been making recently and unfortunately (for me) no one over there seems to care! There simply doesn't seem to be the same draw (I'm guessing the tumblr demographics are different, probably younger and more emo). Ultimately I decided that my photography deserved its own account/blog.

I'm here because I want to document my journey into photography. We're actually picking this up midstream because there are plenty of posts over on my tumblr account with photoshoots and what not. Things have been moving rather quickly over the last few months and I have not done a good job of documenting that which I have learned, the thoughts that I've had regarding shoots, the mentality, the proceses, etc. These things are important to me because they affect my work and how I think about things and as they change, I change as does my work.

Speaking of work. I'm here because I want to put down in words how this all came about. How this became my work. How I at 30 years of age walked away from a life of corporate empires and created something of my own for myself. Something that I probably should have done long ago. It's a journey of self-discovery however trite that might sound because there are roots here that I'm tapping that I haven't touched since I was 5 years old and sketching (rather poorly I might add) on paper. I'm old enough to know myself better now and I suppose the first 30 years were just figuring out who I am... now I'd like to see that knowledge applied in a useful manner.

The road is not easy. It will never be easy. But I'd like to put these thoughts down here and share with you the challenges, accomplishments, thoughts and feelings of a photographer's journey...

Amber McNeil

This is pretty much a direct rip from my Flickr picture description...

If Adriana Lima and Jennifer Love Hewitt had a baby, she would be Amber McNeil.

I was flipping through yesterday's shoot looking for unusable shots and when I saw this one, I was compelled to drop what I was doing and post-process it. This one knocked my socks off.

Strobist info: Lighting-wise this was pretty simple. The obvious things are the hairlight and background light. The hairlight was a SB-800 with an Lumiquest SBIII attached to it on a boom at about 45 degrees behind the model (directly in front of the camera). The BG light was also on a boom, a SB-26 shining bare light onto a black BG to provide separation. The main light was an AB800 with an AB Beauty Dish gridded (I think). God I love the AB800 with the gridded beauty dish. More on this later. This was actually cross-lit because opposing the AB800 was an SB600 or SB800 hitting the model's hair and left shoulder (from camera front right). The AB800 as you can probably guess came from camera left.

Lots of little things done via post-process but nothing that really changed the constitution of the picture. Little things like dodge and burn, levels, curves, color balance, saturation, gaussian blurs, etc. Little bit of clarity and vignetting processed in Lr. I purposely processed this a little dark because things on my Mac that look well lit wind up looking too bright on PCs. Let me know if this is a mistake...

Camera info: 1/200th f/9.0 ISO200 shot with a Nikon D3 and 24-70mm f/2.8G lens. Triggered with Gadget Infinity V4's and SB-800/SB-26 built-in slaves

There's actually so much more to say about this shot but I'm going to save some for later because I'm still figuring out how to set up this blog. Stay tuned!