My photographic style requires that I have high ceilings, white walls and corners. The problem is that my makeshift studio has off-white colored walls, low ceilings and no corners. So part of the problem is that I simply need a new place to shoot.
But not everything can be resolved with simply moving to another studio. I would love to be able to shoot with sunlight against white walls. You can do this one of two ways. You bring a wall to the sun or you bring the sun to the wall. Between the two, it's probably easier to move a wall than it is to move the sun.
The problem with bringing the wall to the sun is that I don't have a white wall outside my house. Looking through my flickr, you'll find lots of walls, a brown wooden one, a brick one, the wood shakes along my house, but no white walls outside my house. Besides, even if you find a static one, you're then at the mercy of the sun and thus the time of day.
I realized that I needed a portable wall. Hell I want a portable corner and freestanding so no one has to hold it. I know they exist and I'm sure there are plenty of set construction companies that can make one for me, after all I'm only a few miles from Hollywood. But at what cost?
As I was filling out an online request for proposal (trying to get bids) and listing out all my criteria, I realized I needed to be more specific. So I reviewed the Kesler Tran video where they shot in the dry lake bed.
As I reviewed the video closely, I started seeing things that I never noticed the first time I watched it. I noticed details in the frame and the screws and metal tie plates that were used. The more I watched, the more I understood how the walls were constructed. So I asked myself, "I wonder if I build this myself?" In asking the question, I started to draw and came up with this:

While this was a good start. I had still too many questions about what actual parts I needed. All I knew is that I had 2 tile boards 4'x8' that I could start with but there are millions of different screws and I didn't know which screws I needed to put the tile board to the frame. What I did know is that I had as much information as I could gather from the video and the next step was to head to Home Depot to get some answers.
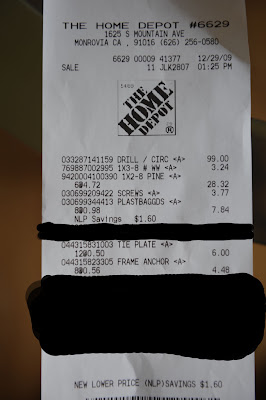
3 hours at Home Depot will give you some answers. That said, there were several nice Home Depot employees that answered some pretty important questions. Ultimately my receipt looked like this:

I won't go into the details about which screws I used. Since you now have the receipt, you can use the serial code to find the parts if you so choose. My total cost excluding the drill/saw combo was $53.65. Could it have been done for cheaper? Sure. But that's not the point. I needed wood that wouldn't crack/split upon being screwed into. Also the other important thing I learned is that when it says 1x2 it's really .75"x1.5". That almost screwed me because the screws I bought assumed that the wood was 1"x2".
So I came home and cut the wood to size and assembled the frame. While it was still kind of flimsy, after attaching the tile board to it with the screws, the final product was rock solid. All I needed to do then was to attach the two pieces together with the metal L tie plates and here's the final product:


So how will I use it? Kinda like this, but hopefully with a better looking model:


Looking forward to seeing it in action. Have you seen the Zach Arias tutorial on shooting white seamless? He uses two walls similar to yours in his studio. Here's his dicussion of them in his Part #2.
ReplyDeletehttp://www.zarias.com/?p=77
ReplyDeletelike Gregory, ZA's tutorial was the first thing i thought of. he's the master of the white tile board.
ReplyDeletei can tell from your test shot already -- this is going to be interesting!
I took a quick look at ZA's thing and he uses it differently than I plan to use this... although, it's nice to know that there are so many options with this :)
ReplyDeleteOn another note, I seem to be outputting much more than I've been "inputting". I need to get in touch with the "outside world"!
I saw the Kesler Tran video and I always thought that this was a slick way of having a nice soft backdrop but still keeping the hard edge. I am glad to see someone else build this wall and see the finished product, very nice work.
ReplyDeleteI think I am going to build one in place of the backdrop for now.