The same thought process applies to editing.
Lightroom is a digital asset management tool that builds in many basic Photoshop adjustment functions. I understand that for most users, Lr is the "final destination" and thus Adobe makes it easy for users to batch process multiple images and even applies basic default adjustments that make 95% of users "happy".
I'm not one of those 95% and I am very unhappy with the default Develop settings.
I've always had gripes about Lightroom's default adjustments. I noticed this in Lightroom 3 but thought it more of a pet-peeve than a violation of "free-will". Upon converting to Lightroom 4, the curtains were pulled and I saw Lightroom for the puppet-master that it really was.
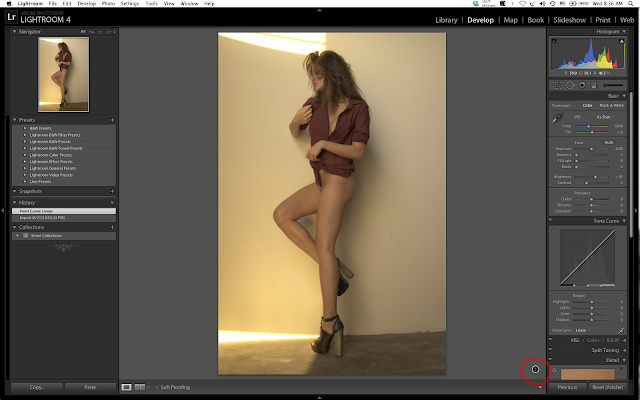
Below are my default settings in Lr 3:

Note the little exclamation icon on the image (that I've circled in red) reminding me that these older images need to be "updated" with the Lr4 image processing "engine".
What you should understand is that these were my Lr3 settings. That after years of use, I settled on the above Develop settings as an import default. The following are the original Lr3 default settings:
- Camera Profile: Adobe Standard
- Color Noise Reduction: 25, Detail: 50
- Sharpness: 25, radius: 1, Detail: 25
- Contrast: 25
- Brightness: 50
- Blacks: 5
- Tone Curve Medium
The following is a text version of my adjustments as depicted above:
- Camera Profile: Adobe Standard
- Color Noise Reduction: 0, Detail: 50
- Sharpness: 0, radius: 1, Detail: 25
- Contrast: 0
- Brightness: 40
- Blacks: 0
- Tone Curve Linear
What did I do? Basically I wanted the most linear, zeroed out, and flat starting point for evaluating my images for subsequent processing. So I zeroed out noise reduction, sharpness, contrast, blacks and the tone curve. I then brought down the brightness a bit because I felt the default brightness was "artificial".
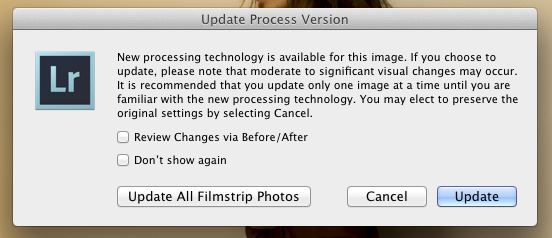
And I could have lived with that if Lr4 hadn't shown me the truth behind Lightroom Develop default settings. When you click the exclamation button you see the following text:

I remember being pretty excited about Lr4 and the improvements that it would bring to RAW processing. And while there are significant improvements to user control over RAW adjustments, I still can't get over the translation of my defaults between Lr3 and Lr4.

From what I can tell, Lr4 regarded my 40 Brightness in Lr3 as a -.20 Exposure adjustment in Lr4. It also took my 0 Contrast in Lr3 and converted that into a -33 Contrast in Lr4. My 0 Blacks in Lr3 were now +25 Blacks in Lr4. And my linear Tone Curve in Lr3 was now a custom Tone Curve with a significant boost in Shadows.
WTF.
There is a severe disconnect between what I consider "zero" and what Lightroom considers "zero". With the new Lr4 interface, it's more obvious than ever that the Adobe engineers default process the images for extra contrast and brightness via Blacks, Exposure, Contrast and Tone Curve adjustments that are anything but "zero".
But why does it matter?
Again, for 95% of the population the default Develop adjustments are a welcome upgrade to otherwise flat and lacking images. But for professionals that want to see their images with maximum detail, the default Exposure, Brightness, Contrast, Noise Reduction, and Sharpness adjustments only convolute our ability to make proper editing decisions. If Lightroom truncates Blacks and Shadows (via Tone Curve) by default, then I can not apply subsequent contrast, levels, and/or exposure adjustments in Photoshop. Why would I want to do this in Photoshop when there are so many controls in Lightroom? For the exact reason why Adobe still makes Photoshop. Photoshop provides the type of control over an image that Lightroom can not even begin to fathom. Blend modes, opacity, proper masking, etc.
I've been mad at Lightroom a long time but it wasn't until I revisited some old images that I had the chance to really "catch" Lr4 in the act of converting my default Develop settings into what you see above. It makes me a little sick that Adobe allows Lightroom to take such luxuries with my images. So as someone one that believes in free-will, Lr4's default Develop adjustments are crimes against humanity. This is one of the big drivers for the Adobe Camera Raw & RAW Adjustments Webinar I taught back in June.
If you've learned anything from this post, I hope that you've understand that you as the user must make your own decisions. Do not under any circumstance allow Adobe, Apple, PhaseOne, Canon, Nikon, Sony, etc. to make decisions for you that you don't 100% understand and allow.

I take it that you're not using the LR5 yet, cause with that you wont even get the exclamation mark. And LR5 comes with 2012 raw processing that you have to convert to and it is really good :)
ReplyDeleteAnyways I disagree most of what you said about LR4 (it is same RAW processor is as CS6 ACR btw).
LR4 converted me back to Lightroom from Capture One, cause it actually deals with all aspects of the image histogram properly (at least in the Basic Settings). No more ambiguous Exposure vs Brightness crap, or Fill light or Recovery BS. And you can actually 0 out the settings (even though you may not like what 0 is, but they are actual 0s from the processing perspective ). And since the LR3 basic settings were overlapping and ambiguous the conversion from LR3 settings to LR4 settings are not what you want to leave to Lightroom. It does a good job in some cases but messes up in most. You need to build your new default setting manually if you want to see a specific look from LR4 rather than autoconverting the default preset. I find LR5 does a little better job in the autoconversion but any localized adjustments may be zeroed out.
If you want to achieve the same look I suggest the following:
1. Create Virtual Copy
2. Change Processing to the latest version in the Virtual Copy <-Lightroom will apply default settings
3. Zero out the settings in Basic and curves (other than the Color Balance)
4. Go up to the histogram, and match it as much as you can to the original histogram by simply moving it around, the sliders will adjust automatically
5. Fine tune the sliders, at this point should be easy because each slider directly moves one specific part of the histogram.
6. Fine tune contrast through slider or tone curve.
In the end what you have in your Camera in RAW will always be converted when its transferred to your computer. It is about how much control you can have for this conversion matters.
I shoot BW RAW, I have a default BW preset in LR4 that gives me very close presentation of what I see at the back of the camera based on the camera model : so I pick BW-Canon5DIII, BW-Canon7D, BW-Nex7 profiles during image import. Post import I apply additional presets to selected Virtual Copies before moving to PS.
I agree that LR3 had more ambiguous adjustments. But as with all things Lightroom, the adjustments are geared towards to amateurs and not meant to be a full-fledged photo-manipulation software such as Photoshop. It's easier for people to understand Recovery/Fill Light rather than Whites/Highlights/Shadows/Blacks. And for what it's worth I sometimes miss the Brightness slider in Lr because Exposure is indiscriminate about blowing highlights.
ReplyDeleteFor the record I sometimes use the Brightness slider in Photoshop.
I think the point is that people have to understand that "zero" is not universally-accepted objective term. Somewhere someone is making some decision about how "zero" is defined. Whether it is Sony/Nikon/Canon/Adobe/or you the user, the conversion between an analog scene into a digital image requires much subjective decision-making. You might argue that Lr4/Lr5's zero settings are the most true to the RAW image "zeroes" but that interpretation assumes that Sony/Canon/Nikon has interpreted the image properly in the first place. But what does "properly" even mean? So first and foremost one has to acknowledge that all "zero" settings are dependent upon the engineers writing the DAC conversion code which are all ultra proprietary hence the NEF and CR2.
Assumptions built upon assumptions.
I suppose the premise of my original post was faulty to begin with because the assumption was that Lightroom was "lying to me". But the truth is that Lightroom doesn't know the truth to begin with because they are assuming that Nikon/Canon/Sony know the truth. It's like going to see the Wizard of Oz and finding out he's just some old dude that helps us realize that everything we want we already possess within us all along. Or like Neo (from the Matrix) seeking the truth. When the truth is he already knows the truth and the only question is whether or not he is ready to accept it or not.
There is no "truth". It's all interpretation.
Philosophy aside I am intrigued that you make profiles matching your camera-back displays because again, that assumes that the camera-back display is capable of interpreting the digital file properly. Economics tells us that the camera-back display is not a high priority for color accuracy. It's neither capable of representing color accuracy, color gamut, brightness/contrast, or color profile. And when you create profiles to your cameras such as the Sony NEX-7 do you profile to the EVF or the camera-back display? The EVF has much more contrast especially in with the B&W images. I fear that creating Lr profiles that match the camera-back displays would require substantial RAW adjustments that reduce the dynamic range of the RAW file. Camera-back displays are notoriously bad at displaying extreme shadows and highlights. I typically use the camera-back only for reference. The only thing I trust on the back of the camera is the histogram.
But if you ever needed those shadows/highlights, you'd have them in spades! In fact with those profiles you've probably got plenty of headroom in the exposure and recovery in the shadows to spare!