
That's what I dragged out to Kauai and Oahu over this past week. How many times did I use it? Once. Twice maybe. My camera saw the light of day maybe like 3 times. Ultimately I could have ditched the 3 stands I brought at home.
30 lbs. of equipment traveling over 6000 miles.
What did I bring you ask? Off the top of my head they are as follows:
- D3
- 24-70mm f/2.8
- 85mm f/1.8
- 14-24mm f/2.8
- 50mm f/1.8
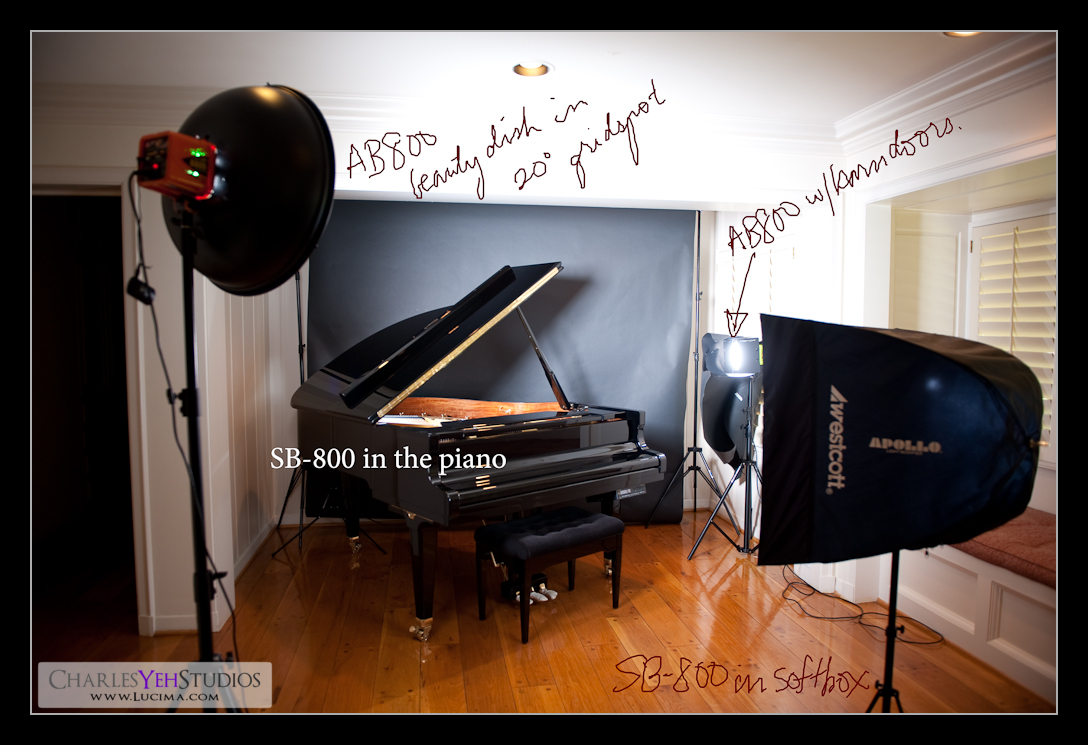
- 3 SB-800's
- 2 umbrellas
- 3 Manfrotto Nano 001B lighstands
- 1 tripod with medium sized head (Giotto 1301)
- 1 gel pack
- 1 DIY gridspot
- 1 Cactus V4 trigger and 4 V4 receivers
- 1 Phottix Cleon N8 remote
- 1 Rocket Blower
- 1 set of spare AA batteries
This does not include the Macbook, Wacom tablet, etc. which I did use.
So in a conversation with one of my buddies traveling with me, I began talking about how primitive photography was as far as how much equipment is necessary to create the shot. The more I thought about it, the madder I became at how backwards this art/hobby/whatever is. I mean the personal computer now does 1 gajillion times what it did 10 years ago 1 gajillion times faster at 1/gajillionth of the size. Why the hell can't we do the same thing with imaging and optics? I feel like a caveman lugging around 4 lenses and one ginormous pro-body. It's heavy. I'm tired. This sucks.
Of course, if you think about the leaps and bounds that we've made with consumer and especially digital cameras, we shouldn't complain. Also the strobist movement is changing the landscape of what was traditionally limited to in-studio photography so in that respect, the times are changing. Already we are seeing changes to the equipment that is being sold with the manufacturing of adapters for on-camera-strobes and what not.
That being said though, the compactness I'm talking about will perhaps never be realized in my lifetime. I'm talking about just being able to point to a spot in mid-air and saying, "I want x stops of light coming from here, in y direction, with z softness" and voila! That light would be there. No cords, no batteries, no light modifiers. It would just "appear". Oh and of course be synced with the shutter at 1/10,000th of a second. Actually there would no longer be a shutter. I would just hold the index finger and my thumb in an L with both hands in the shape of a frame and say, "click" to take the picture. The strobes in their respective positions would fire in-sync, with no delay on refresh rates, and the pictures would download into an external hard-drive in my pocket (or internal one in my fingers).
Post-processing would consist of drawing on an imaginary tablet that would project in front of me in the air that would move with the position of my head/neck. Everything would be done "virtually" without equipment. All I'd have to do is be there and I'd be able to capture the shot. Sure, I'd still need to know-how and skill to produce these pictures but the equipment would all be virtual...
Wouldn't that be just perfect.


